

How Set In Net Core Config File In Console App

First EF Core Console Application
Here you will learn how to use Entity Framework Core with Code-First approach step by step. To demonstrate this, we will create a .NET Core Console application using Visual Studio 17 (or greater).
The .NET Core Console application can be created either using Visual Studio 2017 or Command Line Interface (CLI) for .NET Core. Here we will use Visual Studio 2017.
To create .NET Core Console application, open Visual Studio 2017 and select on the menu: File -> New -> Project.. This will open the New Project popup, as shown below.
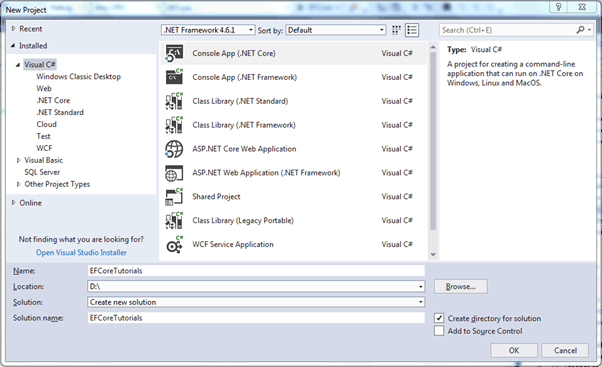
In the New Project popup, expand Installed -> Visual C# in the left pane and select the Console App (.NET Core) template in the middle pane. Enter the Project Name & Location and click the OK button to create a console application, as shown below.

Now, we need to install EF Core in our console application using Package Manager Console. Select on the menu: Tools -> NuGet Package Manager -> Package Manager Console and execute the following command to install the SQL Server provider package:
PM> Install-Package Microsoft.EntityFrameworkCore.SqlServer
Learn more about installing EF Core in the EF Core Installation chapter.
Creating the Model
Entity Framework needs to have a model (Entity Data Model) to communicate with the underlying database. It builds a model based on the shape of your domain classes, the Data Annotations and Fluent API configurations.
The EF model includes three parts: conceptual model, storage model, and mapping between the conceptual and storage models. In the code-first approach, EF builds the conceptual model based on your domain classes (entity classes), the context class and configurations. EF Core builds the storage model and mappings based on the provider you use. For example, the storage model will be different for the SQL Server compared with DB2.
EF uses this model for CRUD (Create, Read, Update, Delete) operations to the underlying database.
So, we need to create entity classes and context classes first. The followings are simple entity classes for Student and Course:
public class Student { public int StudentId { get; set; } public string Name { get; set; } } public class Course { public int CourseId { get; set; } public string CourseName { get; set; } }
Now, we need to create a context class by deriving the DbContext, as shown in the previous chapter. The following SchoolContext class is also called context class.
namespace EFCoreTutorials { public class SchoolContext : DbContext { public DbSet<Student> Students { get; set; } public DbSet<Course> Courses { get; set; } protected override void OnConfiguring(DbContextOptionsBuilder optionsBuilder) { optionsBuilder.UseSqlServer(@"Server=.\SQLEXPRESS;Database=SchoolDB;Trusted_Connection=True;"); } } }
The above context class includes two DbSet<TEntity> properties, for Student and Course, type which will be mapped to the Students and Courses tables in the underlying database. In the OnConfiguring() method, an instance of DbContextOptionsBuilder is used to specify which database to use. We have installed MS SQL Server provider, which has added the extension method UseSqlServer on DbContextOptionsBuilder.
The connection string "Server=.\SQLEXPRESS;Database=SchoolDB;Trusted_Connection=True;" in the UseSqlServer method provides database information: Server= specifies the DB Server to use, Database= specifies the name of the database to create and Trusted_Connection=True specifies the Windows authentication mode. EF Core will use this connection string to create a database when we run the migration.
After creating the context and entity classes, it's time to add the migration to create a database.
Adding a Migration
EF Core includes different migration commands to create or update the database based on the model. At this point, there is no SchoolDB database. So, we need to create the database from the model (entities and context) by adding a migration.
We can execute the migration command using NuGet Package Manger Console as well as dotnet CLI (command line interface).
In Visual Studio, open NuGet Package Manager Console from Tools -> NuGet Package Manager -> Package Manager Console and enter the following command:
PM> add-migration CreateSchoolDB
If you use dotnet CLI, enter the following command.
> dotnet ef migrations add CreateSchoolDB
This will create a new folder named Migrations in the project and create the ModelSnapshot files, as shown below.

Learn more about it in the Migration chapter.
After creating a migration, we still need to create the database using the update-database command in the Package Manager Console, as below.
PM> update-database –verbose
Enter the following command in dotnet CLI.
> dotnet ef database update
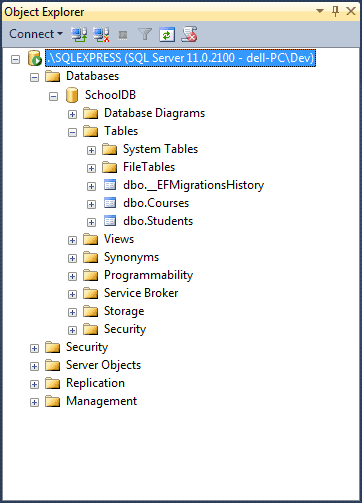
This will create the database with the name and location specified in the connection string in the UseSqlServer() method. It creates a table for each DbSet property (Students and Courses) as shown below.
This was the first migration to create a database. Now, whenever we add or update domain classes or configurations, we need to sync the database with the model using add-migration and update-database commands.
Reading or Writing Data
Now, we can use the context class to save and retrieve data, as shown below.
namespace EFCoreTutorials { class Program { static void Main(string[] args) { using (var context = new SchoolContext()) { var std = new Student() { Name = "Bill" }; context.Students.Add(std); context.SaveChanges(); } } } }
Thus, you need to perform these steps to use Entity Framework Core in your application. Visit Saving Data and Querying chapters to learn more about saving and retrieving data in EF Core.
How Set In Net Core Config File In Console App
Source: https://www.entityframeworktutorial.net/efcore/entity-framework-core-console-application.aspx
Posted by: ambrosinoagagedly.blogspot.com
0 Response to "How Set In Net Core Config File In Console App"
Post a Comment